Sanding shutters

Description
Tools/accessories
Procedure
Slight surface weathering:
-
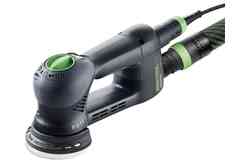
To sand the surfaces and edges of slightly weathered shutters, you must first fix the sanding pad (black) to the ROTEX geared eccentric sander. Set the machine speed to 6. For water-based paints, the speed may need to be reduced – at full speed, the abrasive can become clogged very quickly due to the thermoplasticity of the paints.

-
Set the ROTEX to fine sanding and fix Granat P150–P240 abrasive to the sanding pad. Depending on the condition of the surface, use a coarser or finer abrasive. Connect the ROTEX to a mobile dust extractor and sand the surface using light pressure.

-
To sand corners, such as the area around the fittings on shutters, attach a triangular sanding base to the ROTEX and use the button to fix a soft sanding pad onto the triangular base.

-
Next, set the machine speed to 6 and set the ROTEX to Delta mode. Fix Granat P150–P240 abrasive on the sanding pad. Depending on the condition of the surface, use a coarser or finer abrasive. Next, connect the ROTEX to a mobile dust extractor and sand the corners.

-
To sand the slats on shutters, attach a slat sanding pad to the ROTEX and set the machine speed to 3–4.

-
Set the ROTEX to Delta mode and fix Granat P150–P240 abrasive to the sanding pad. Depending on the condition of the surface, use a coarser or finer abrasive. Connect the ROTEX to a mobile dust extractor and sand the slats without applying any pressure to them. Once you have finished sanding the shutters, you can begin to clean the surface and to apply the coating.

Procedure
-
To sand the surfaces and edges of severely weathered shutters, fix the blue sanding pad to the ROTEX geared eccentric sander. This sanding pad is harder than the black version and therefore has a higher material removal capacity than the standard pad.

-
Set the ROTEX to coarse sanding and set the machine speed to 6. For water-based paints, the speed may need to be reduced – at full speed, the abrasive can become clogged very quickly due to the thermoplasticity of the paints. Fix Granat P80–P120 abrasive on the sanding pad. Depending on the condition of the surface, use a coarser or finer abrasive.

-
Connect the ROTEX to a mobile dust extractor and sand the shutters evenly until you have produced a stable underlying surface or until all of the bare wood has been exposed. After finishing the coarse sanding, set the ROTEX to fine sanding and sand the surfaces again using Granat P150–P180 abrasive.

-
To sand corners, such as the area around the fittings on shutters, first attach a triangular sanding base to the ROTEX and use the button to fix a hard sanding pad onto the triangular base. Set the machine speed level to 6 and set the ROTEX to Delta mode. Fix Granat P80–P100 abrasive to the sanding pad. Depending on the condition of the surface, use a coarser or finer abrasive.

-
Connect the ROTEX to a mobile dust extractor and sand the corners evenly until you have produced a stable underlying surface or until all of the bare wood has been exposed. The corners can also be re-sanded using Granat P150–P280 after the shutters have been sanded.

-
To sand the slats on shutters, attach a slat sanding pad to the ROTEX and set the machine speed to 6. Fix Granat P40–P80 abrasive on the sanding pad. Depending on the condition of the surface, use a coarser or finer abrasive. Connect the ROTEX to a mobile dust extractor and sand the slats until you have produced a stable underlying surface or until all of the bare wood has been exposed. Re-sand the slats using Granat P150–P180.

-
After applying the undercoat/primer, the ROTEX and Granat P240–P320, or alternatively a Festool manual abrasive, can be used for intermediate sanding. After coating the shutters, they are ready to be fitted again. If this work is carried out correctly with the right materials, the shutters will be functional, aesthetically pleasing and protected against the effects of weather for years to come.

-
Our illustrated guides and work results are documented working steps that we have performed in practice. They are individual examples and do not guarantee or promise that users will obtain the same results. The results will depend on the user's experience and skill, as well as the material being used. Illustrated guides do not replace any Festool operating manuals and/or safety instructions. Liability for ensuring that the information, instructions and applications are free from content defects and defects of title, in particular with regard to the absence of defects, correctness, freedom from third party intellectual property rights and copyrights, completeness and fitness for purpose, is excluded. Claims for damages made by the user, regardless of their legal basis, are excluded. These liability exclusions are not applicable if the damage was intentional or caused by gross negligence, or in cases of statutory liability.
We cannot accept liability for damage resulting from defects.↑


